ADO to GitHub Migration
Complete Migration Guide using gh-ado2gh
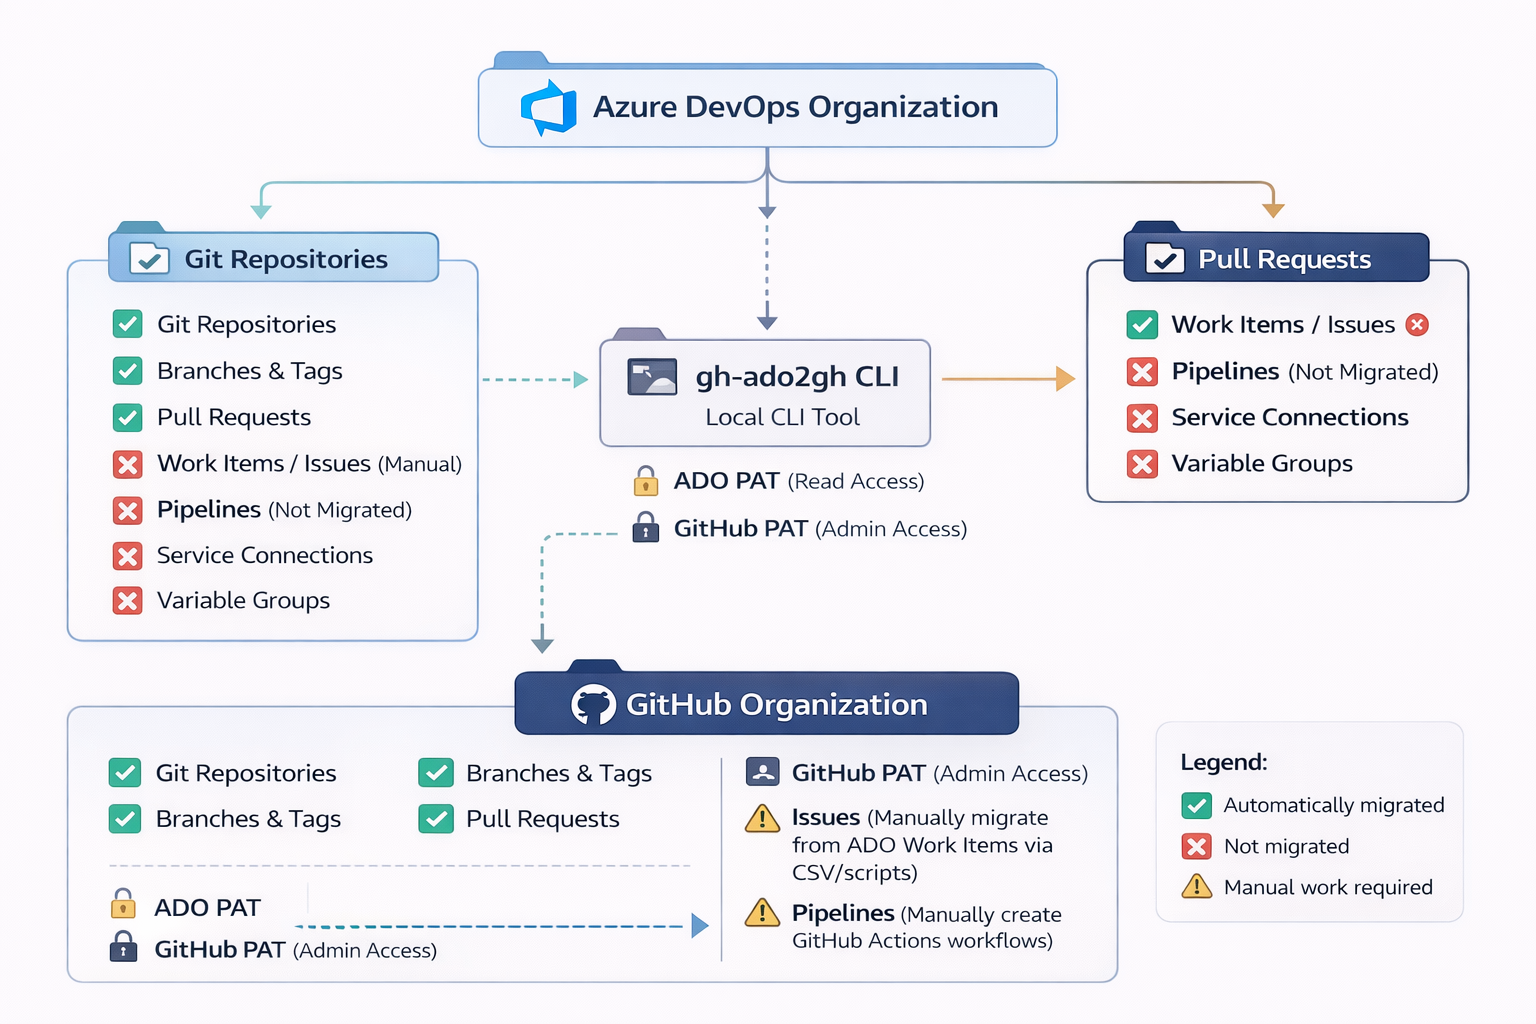
What Gets Migrated
-
✓ Git Repositories
Complete commit history, all branches -
✓ Branches & Tags
All refs preserved with commit SHAs -
✓ Pull Requests
PR titles, descriptions, comments -
✓ Users
Mapped by email address where possible -
✓ Commit Authors
Git history preserved with original authors
-
✗ Work Items / Issues
Not migrated by gh-ado2gh - manual CSV export/import or scripts required -
✗ Azure Pipelines (YAML)
Recreate as GitHub Actions workflows -
✗ Azure Pipelines (Classic)
Recreate as GitHub Actions workflows -
✗ Service Connections
Configure GitHub secrets/environments -
✗ Variable Groups
Recreate as GitHub Variables/Secrets -
✗ Release Pipelines
Design GitHub Actions deployment workflows -
✗ Wikis & Test Plans
Manual migration or not supported
Prerequisites
Before starting the migration, ensure you have:
- PowerShell (version 5.1 or higher)
- Git installed and configured
- GitHub CLI (gh) installed
- GitHub Organization Owner access
- Azure DevOps Organization Administrator access
- Internet connectivity (stable connection recommended)
- Backup of Azure DevOps repositories (recommended)
Architecture Overview
The migration architecture demonstrates the flow from Azure DevOps to GitHub using the gh-ado2gh extension.
Migration Steps Overview
Complete migration process in 12 comprehensive steps:
Detailed Migration Steps
Follow this comprehensive step-by-step guide to migrate your Azure DevOps repositories to GitHub:
Download and Install
- Visit: https://cli.github.com/
- Download the installer for Windows
- Run the installer and follow the prompts
- Restart PowerShell after installation
Verify Installation
gh --version
Authenticate with GitHub
gh auth login
Follow the prompts:
- Select: GitHub.com
- Select: HTTPS
- Authenticate in browser: Yes
- Complete browser authentication
Install the Migration Extension
gh extension install github/gh-ado2gh
Verify Installation
gh ado2gh --version
View Available Commands
gh ado2gh --help
Available Commands:
generate-script- Generate PowerShell migration scriptmigrate-repo- Migrate single repositorygrant-migrator-role- Assign migrator permissionsrevoke-migrator-role- Remove migrator permissionsinventory-report- Generate inventory of ADO resources
Generate ADO PAT
- Navigate to: https://dev.azure.com
- Click your profile icon (top-right corner)
- Select Personal Access Tokens
- Click + New Token
Configure Token Settings
| Setting | Value |
|---|---|
| Name | ado-to-github-migration |
| Organization | Select your Azure DevOps organization |
| Expiration | 30 days (or as needed) |
Required Scopes
- Code - Read
- Work Items - Read
- Identity - Read
- Project and Team - Read
- Pull Request Threads - Read
Important: Copy the token immediately after creation - it's shown only once!
Important: Fine-grained tokens are NOT supported. You must use Classic PAT.
Generate GitHub Classic PAT
- Navigate to: https://github.com/settings/tokens
- Click Personal access tokens → Tokens (classic)
- Click Generate new token (classic)
Configure Token Settings
| Setting | Value |
|---|---|
| Note | ado-to-github-migration |
| Expiration | 30 days (or as needed) |
Required Scopes
- repo (Full control of private repositories)
- workflow (Update GitHub Action workflows)
- admin:org (Full control of organizations)
- delete_repo (Delete repositories - if needed)
Important: Copy the token immediately - it's shown only once! Store it securely.
Set PATs as Environment Variables
# Set GitHub PAT

$env:GH_PAT = "ghp_your_github_personal_access_token_here"


# Set Azure DevOps PAT

$env:ADO_PAT = "your_azure_devops_personal_access_token_here"
Verify Variables Are Set
# Check GitHub PAT

Write-Host "GH_PAT: $($env:GH_PAT.Substring(0,10))..." -ForegroundColor Green


# Check ADO PAT

Write-Host "ADO_PAT: $($env:ADO_PAT.Substring(0,10))..." -ForegroundColor Green
Make Variables Persistent (Optional)
To persist across PowerShell sessions:
[System.Environment]::SetEnvironmentVariable('GH_PAT', 'ghp_your_token', 'User')

[System.Environment]::SetEnvironmentVariable('ADO_PAT', 'your_token', 'User')
How to Get Required Information
📋 Finding Your GitHub Organization Name:
- Go to github.com and log in
- Click your profile picture (top-right)
- Look under "Your organizations" section
- Alternative: Check the URL when viewing your org:
https://github.com/YOUR-ORG-NAME
👤 Finding Your GitHub Username:
- Go to github.com
- Click your profile picture → "Your profile"
- Your username appears in the URL:
https://github.com/YOUR-USERNAME
Grant Migrator Role
gh ado2gh grant-migrator-role `

  --github-org "your-github-org" `

  --actor "your-github-username" `

  --actor-type USER
Real-World Example:
gh ado2gh grant-migrator-role `

  --github-org "SwarupPuvvada" `

  --actor "ado2gh-swarup" `

  --actor-type USER
⚠️ Important Requirements:
- You MUST be an Organization Owner to run this command
- Use Classic PAT (not fine-grained token)
- The
--actor-type USERparameter stays the same
Note: The inventory-report command with --output flag is currently not working reliably. Use generate-script directly instead.
Generate Migration Script
Generate a PowerShell script for bulk migration:
gh ado2gh generate-script `

  --ado-org "your-ado-org" `

  --github-org "your-github-org" `

  --output migration-script.ps1
Example:
gh ado2gh generate-script `

  --ado-org "SwarupPuvvada" `

  --github-org "ado2gh-swarup" `

  --output migration-script.ps1
Expected Output:
✓ Generated migration script: migration-script.ps1
✓ Found 3 repositories
Open and Review Script
notepad migration-script.ps1
What the Script Contains
Each repository migration command looks like:
gh ado2gh migrate-repo `

  --ado-org "SwarupPuvvada" `

  --ado-team-project "MyProject" `

  --ado-repo "my-app-repo" `

  --github-org "ado2gh-swarup" `

  --github-repo "my-app-repo"
Customize the Script
You can edit the script to:
- Rename repositories:
--github-repo "new-repo-name" - Exclude specific repositories: Comment out or remove unwanted migrations
- Change migration order: Reorder commands (migrate smaller repos first)
- Add repository descriptions:
--repo-description "My application"
Execute Migration Script
.\migration-script.ps1
What Happens During Migration
- Repository Creation - GitHub repository is created
- Git Push - All commits, branches, tags are pushed
- Pull Requests - PRs are recreated with comments
- Work Items - Issues are created from ADO work items
- User Mapping - Users mapped by email addresses
Expected Duration
| Repository Size | Estimated Time |
|---|---|
| Small (<100 MB) | 2-5 minutes |
| Medium (100 MB - 1 GB) | 5-15 minutes |
| Large (1 GB - 5 GB) | 15-60 minutes |
| Very Large (>5 GB) | 1-4 hours |
Check Migration Status
gh ado2gh migration-status `

  --github-org "your-github-org"
View Migration Logs
Logs are automatically created during migration:
- Location: Same directory as script
- Format:
migration-{timestamp}.log
Get-Content .\migration-*.log -Tail 20
Watch for Errors
Common errors during migration:
- ❌ Repository name conflicts
- ❌ Large file size issues (>100 MB files)
- ❌ Network timeouts
- ❌ PAT permission issues
Verification Checklist
For each migrated repository, verify:
- Repository accessible in GitHub
- All branches present (compare with ADO)
- Commit history intact (check commit count)
- Pull requests migrated (review open/closed PRs)
- Issues created (from ADO work items)
- Default branch set correctly (usually main or master)
- Repository visibility correct (private/internal/public)
- README displayed on GitHub
- Tags preserved (release tags)
- Clone works (git clone test)
Test Clone
git clone https://github.com/your-org/your-repo.git

cd your-repo

git branch -a

git log --oneline | head -n 10
1. Configure Repository Settings
In GitHub Repository → Settings:
- General: Set description, configure features (Issues, Wiki, Projects), set default branch
- Branches: Add branch protection rules, require PR reviews, require status checks
- Collaborators: Add team access, set permissions (Read, Write, Admin)
2. Migrate Azure Pipelines to GitHub Actions
This is MANUAL WORK - Not automated!
Create .github/workflows/ directory and convert pipelines. See the "Converting Azure Pipelines to GitHub Actions" section above for detailed instructions.
3. Migrate Secrets and Variables
Create GitHub Secrets:
# Using GitHub CLI

gh secret set SECRET_NAME --body "secret-value" --repo your-org/your-repo


# Or via GitHub Web UI

# Settings → Secrets and variables → Actions → New repository secret
4. Configure Environments
Create GitHub Environments for deployments (dev, qa, prod) with:
- Protection rules
- Required reviewers
- Wait timer
- Deployment branches
- Environment secrets
5. Update Documentation
- README.md with GitHub URLs
- CONTRIBUTING.md with GitHub workflow
- CI/CD documentation for GitHub Actions
- Update links from ADO to GitHub
- Update clone URLs
- Update issue tracking references
6. Notify Team
Communicate the migration:
- Send email to team with new GitHub URLs
- Update bookmarks and tooling
- Provide GitHub training if needed
- Share GitHub Actions documentation
- Schedule knowledge transfer sessions
7. Archive Azure DevOps Repository (Optional)
After confirming successful migration:
- Go to Project Settings → Repositories
- Select repository → Security
- Remove all permissions except Admins
- Add "[ARCHIVED]" prefix to repository name
- Update description: "Migrated to GitHub: [url]"
Common Issues & Troubleshooting
Encountering problems during migration? Here are the most common issues users face and how to resolve them:
Error Message: "Authentication failed" or "Token does not have required permissions"
Root Cause
The gh-ado2gh tool ONLY works with Classic Personal Access Tokens. Fine-grained tokens are NOT supported.
Solution
- Go to: https://github.com/settings/tokens
- Click Personal access tokens → Tokens (classic)
- Click Generate new token (classic)
- Select these scopes:
- ✅ repo (Full control)
- ✅ workflow
- ✅ admin:org (write:org, read:org)
- ✅ delete_repo (if needed)
- Generate and copy the token
- Update your environment variable:
$env:GH_PAT = "ghp_your_classic_token_here"
Error Message: "Organization not found" or "Access denied"
Root Cause
CRITICAL: The gh-ado2gh migration tool ONLY works with GitHub Organizations. It does NOT work with personal GitHub accounts.
How to Check if You Have an Organization
Method 1: Check Your Organizations List
- Go to github.com and log in
- Click your profile picture (top-right)
- Look for "Your organizations" section
- If empty → You need to create one ❌
- If you see organizations listed → You're ready ✅
Method 2: Check URL Structure
- ❌ Personal account:
https://github.com/username - ✅ Organization:
https://github.com/orgs/org-name
Solution: Create a GitHub Organization
Step 1: Navigate to Create Organization
- Click your profile picture → "Your organizations"
- Click "New organization" (green button)
- OR visit: https://github.com/organizations/plan
Step 2: Choose a Plan
- 💰 Free - $0/month (unlimited public/private repos, 2,000 CI/CD minutes)
- 💼 Team - $4/user/month (advanced collaboration)
- 🏢 Enterprise - $21/user/month (SAML SSO, advanced security)
✅ Recommended: Start with "Free for organizations"
Step 3: Set Up Your Organization
- Organization account name: Choose a unique name (e.g.,
mycompany-org) - Contact email: Enter a valid email
- Belongs to: Select "My personal account"
- Click "Next" and complete setup
✅ Verify: After creation, your organization URL should be https://github.com/YOUR-ORG-NAME
Error Message: "You must be an organization owner to run this command" or "Permission denied"
Root Cause
You need Owner role (not just Member) in the GitHub Organization to run migrations and grant migrator roles.
Solution: Check Your Role
- Go to:
https://github.com/orgs/YOUR-ORG-NAME/people - Find your username in the list
- Check the Role column:
- ✅ Owner - You can proceed
- ❌ Member - Ask an Owner to promote you
To Promote Someone to Owner
- Go to:
https://github.com/orgs/YOUR-ORG-NAME/people - Find the user
- Click "..." → Change role → Owner
Error Message: "Failed to grant migrator role" or "Insufficient permissions"
Root Cause
Common causes:
- Using fine-grained token instead of Classic PAT
- Missing admin:org scope on GitHub PAT
- Not an Organization Owner
- Environment variable not set correctly
Solution
Step 1: Verify Your PAT Token Type and Scopes
# Check if PAT is set

Write-Host "GH_PAT: $($env:GH_PAT.Substring(0,10))..."


# Classic PAT starts with "ghp_"

# Fine-grained token starts with "github_pat_"
Step 2: Ensure Classic PAT with Correct Scopes
- Token MUST start with
ghp_ - Required scopes:
- ✅ repo
- ✅ workflow
- ✅ admin:org (both write:org and read:org)
Step 3: Re-authenticate GitHub CLI
gh auth logout

gh auth login
Step 4: Try Granting Migrator Role Again
gh ado2gh grant-migrator-role `

  --github-org "your-org-name" `

  --actor "your-username" `

  --actor-type USER
Error Message: "TF401019: The Git repository with name or identifier does not exist" or "Access denied"
Root Cause
Azure DevOps PAT doesn't have sufficient permissions to read repositories and metadata.
Solution: Recreate ADO PAT with Correct Scopes
- Go to: https://dev.azure.com
- Profile icon → Personal Access Tokens → + New Token
- Select these scopes:
Required Scopes:
- Code - Read
- Work Items - Read
- Identity - Read
- Project and Team - Read
- Pull Request Threads - Read
- Set expiration (30 days recommended)
- Click Create and copy the token
- Update environment variable:
$env:ADO_PAT = "your_new_ado_token_here"
Error Message: "GH_PAT environment variable not set" or "ADO_PAT environment variable not set"
Root Cause
The required environment variables are not configured in your PowerShell session.
Solution
Step 1: Set Environment Variables
# Set GitHub PAT

$env:GH_PAT = "ghp_your_github_classic_token"


# Set Azure DevOps PAT

$env:ADO_PAT = "your_azure_devops_token"
Step 2: Verify They Are Set
# Check both variables

Write-Host "GH_PAT set: $($env:GH_PAT -ne $null)" -ForegroundColor $(if($env:GH_PAT) {"Green"} else {"Red"})

Write-Host "ADO_PAT set: $($env:ADO_PAT -ne $null)" -ForegroundColor $(if($env:ADO_PAT) {"Green"} else {"Red"})
Step 3: Make Persistent (Optional)
To keep variables across PowerShell sessions:
[System.Environment]::SetEnvironmentVariable('GH_PAT', 'ghp_your_token', 'User')

[System.Environment]::SetEnvironmentVariable('ADO_PAT', 'your_token', 'User')


# Restart PowerShell after setting
💡 Tip: Variables set with $env: only last for the current session. Use [System.Environment]::SetEnvironmentVariable() for persistence.
Error Message: "Repository already exists" or "Name already in use"
Root Cause
A repository with the same name already exists in your GitHub organization.
Solution Options
Option 1: Rename the Target Repository
Edit your migration script to use a different name:
gh ado2gh migrate-repo `

  --ado-org "your-ado-org" `

  --ado-team-project "MyProject" `

  --ado-repo "my-app-repo" `

  --github-org "your-github-org" `

  --github-repo "my-app-repo-v2"  # New name
Option 2: Delete or Rename Existing GitHub Repository
- Go to the existing repository in GitHub
- Settings → General → Scroll to bottom
- Either:
- Rename: Change repository name → Click "Rename"
- Delete: Click "Delete this repository" (type name to confirm)
- Run migration again
Option 3: Archive the Existing Repository
- Go to repository Settings → General
- Scroll to "Danger Zone"
- Click "Archive this repository"
- Rename it to
old-my-app-repo - Run migration with original name
Error Message: "remote: error: GH001: Large files detected" or "file is XXX MB; this exceeds GitHub's file size limit of 100 MB"
Root Cause
GitHub has a strict 100 MB file size limit. Files larger than this cannot be pushed to GitHub.
Solution Options
Option 1: Use Git LFS (Large File Storage)
- Install Git LFS:
git lfs install - Track large files:
git lfs track "*.zip"

git lfs track "*.iso"

git lfs track "*.exe" - Add and commit .gitattributes:
git add .gitattributes

git commit -m "Configure Git LFS" - Re-run migration
Option 2: Remove Large Files from Git History
Use BFG Repo-Cleaner or git-filter-repo:
# Using BFG Repo-Cleaner

bfg --strip-blobs-bigger-than 100M repo.git


# Or using git-filter-repo

git filter-repo --strip-blobs-bigger-than 100M
Option 3: Exclude Large Files
- Identify large files before migration
- Add them to .gitignore in ADO
- Store large files in external storage (Azure Blob, AWS S3)
- Run migration without large files
💡 Best Practice: Store binary artifacts, build outputs, and large media files outside of Git using Azure Artifacts, GitHub Packages, or cloud storage.
Error Message: "Connection timeout" or "Failed to connect to github.com" or "The request timed out"
Root Cause
- Large repository taking too long to clone/push
- Unstable internet connection
- Corporate firewall/proxy blocking connections
- GitHub API rate limiting
Solution
Step 1: Increase Git Timeout
# Increase timeout to 1 hour

git config --global http.postBuffer 524288000

git config --global http.lowSpeedLimit 0

git config --global http.lowSpeedTime 999999
Step 2: Configure Proxy (If Behind Corporate Firewall)
# Set proxy

git config --global http.proxy http://proxy.company.com:8080

git config --global https.proxy https://proxy.company.com:8080


# Or with authentication

git config --global http.proxy http://username:password@proxy:8080
Step 3: Use Shallow Clone for Large Repos
# Clone with limited history

git clone --depth 1 https://github.com/org/repo.git


# Or fetch recent commits only

git clone --shallow-since=2024-01-01 https://github.com/org/repo.git
Step 4: Retry Failed Migration
Simply re-run the migration command. If the repository was partially created, you may need to delete it first:
# Delete failed repository

gh repo delete your-org/your-repo --yes


# Re-run migration

.\migration-script.ps1
💡 Tip: For very large repositories (>5 GB), consider migrating during off-peak hours or using a machine with a faster, more stable internet connection.
Known Issue: The inventory-report command with --output flag is currently not working reliably.
Root Cause
This is a known limitation of the gh-ado2gh extension. The inventory report generation may fail or produce incomplete results.
Solution: Skip Inventory, Use generate-script Directly
Instead of generating an inventory report first, go directly to generating the migration script:
# ❌ Skip this step (not reliable)

# gh ado2gh inventory-report --ado-org "org" --output report.csv


# ✅ Use this instead

gh ado2gh generate-script `

  --ado-org "your-ado-org" `

  --github-org "your-github-org" `

  --output migration-script.ps1
Alternative: Manual Inventory
If you need to know what will be migrated, manually check your Azure DevOps organization:
- Go to:
https://dev.azure.com/YOUR-ADO-ORG - Navigate to each project
- Click Repos to see all repositories
- Make a list of repositories you want to migrate
✅ Best Practice: The generate-script command automatically discovers all repositories and creates migration commands for them, so an inventory report is not strictly necessary.
Live Migration Example
Check out this real-world example of a successfully migrated project from Azure DevOps to GitHub:
Migration Success: This repository was successfully migrated using the gh-ado2gh tool with all commit history, branches, and metadata preserved.
Converting Azure DevOps Pipelines to GitHub Actions
Azure DevOps YAML pipelines can be converted using GitHub Actions Importer, the official GitHub CLI-based migration tool.
How It Works
gh extension install github/gh-actions-importer
gh actions-importer dry-run azure-devops
- Analyzes the pipeline structure
- Converts supported steps and jobs
- Generates GitHub Actions workflow YAML
- Produces detailed migration report
gh actions-importer migrate azure-devops
Output
Generated Files:
- .github/workflows/*.yml – Generated GitHub Actions workflows
- Migration Report showing:
- ✅ Converted items
- ⚠️ Partially supported items
- ❌ Unsupported items requiring manual changes
Important Note:
Secrets, service connections, variable groups, approvals, and classic release pipelines are NOT migrated and must be configured manually in GitHub Settings.
Download Resources
Click the buttons below to download this complete migration guide as a PDF for offline viewing or sharing, or download the automated PowerShell script to streamline your migration process with GUI-based configuration.
The PowerShell script features GUI dialogs for easy configuration and was created by Swarup Puvvada